Infrastructure as Code Experiment
Infrastructure-as-Code or IaC is one of the game-shifting techniques in use today. If we can manage our systems using configuration as code with tools like puppet or ansible, why not manage our infrastructure? Obviously that wasn’t possible when all infrastructure was physical, but now, being most of it virtual, is not only possible, it has revealed as the most efficient way of managing infrastructure.
Before the cloud services were generally available, the vSphere vCenter API, Parallels Virtuozzo CLI (openvz), Xen and FreeBSD jails amongst others offered the possibility of automating virtual environment’s deployment using custom scripts. Now we have a lot of tools, from the templates and custom CLIs used by major cloud vendors, to almost provider agnostic tools like Hashicorp’s Terraform or Hashicorp’s Vagrant which I use extensively.
My idea for this exercise was to bring up a lab environment using a jenkins job triggered by a git push to my home gitlab.
Defining my infrastructure
The first step is always defining what to deploy in my case I wanted to deploy a CentOS 7 machine, set up my Sonatype’s Nexus instance as a repository, add elrepo project as additional repository, install the latest kernel from it and update all packages to their latest versions.
This is the day-to-day work of any system operator, because of that, I wanted to do some automation on it.
The ansible playbook used for provisioning the vm was:
---
- name: Vagrant provisioning
  hosts: all
  become: true
  become_method: sudo
  tasks:
    - name: add automation user
      user:
        name: cotterpin
        comment: Automation user
        password_lock: yes

    - name: setup coterpin's ssh key
      authorized_key:
        user: cotterpin
        key: "{{ lookup('file', './keys/cotterpin-id_rsa.pub') }}"

    - name: setup sudoers
      copy:
        dest: /etc/sudoers.d/cotterpin
        content: "cotterpin ALL=(ALL) NOPASSWD:ALL"

    - name: add elrepo base repository
      yum_repository:
        name: elrepo
        description: EL Repo repository
        baseurl: 'https://elrepo.org/linux/elrepo/el$releasever/$basearch/'
        gpgkey: https://www.elrepo.org/RPM-GPG-KEY-elrepo.org
        gpgcheck: yes
        enabled: yes
        file: elrepo

    - name: add elrepo kernel repository
      yum_repository:
        name: elrepo-kernel
        description: EL Repo kernel repository
        baseurl: 'https://elrepo.org/linux/kernel/el$releasever/$basearch/'
        gpgkey: https://www.elrepo.org/RPM-GPG-KEY-elrepo.org
        gpgcheck: yes
        enabled: yes
        file: elrepo

    - name: add elrepo extras repository
      yum_repository:
        name: elrepo-extras
        description: EL Repo Extras repository
        baseurl: 'https://elrepo.org/linux/extras/el$releasever/$basearch/'
        gpgkey: https://www.elrepo.org/RPM-GPG-KEY-elrepo.org
        gpgcheck: yes
        enabled: yes
        file: elrepo

    - name: Trust custom ca key
      copy:
        src: ./files/anthraxca.crt
        dest: /etc/pki/ca-trust/source/anchors/anthraxca.crt
      notify: update ca trust

    - name: Flush handlers
      meta: flush_handlers

    - name: remove official repos
      yum_repository:
        name: '{{ item }}'
        state: absent
        file: CentOS-Base
      loop:
        - base
        - extras
        - updates
      tags: never

    - name: add base mirrored repo
      yum_repository:
        name: nexus-base
        description: 'Locally mirrored repo group'
        baseurl: 'https://192.168.123.100:8081/repository/centos-7-group/'
        enabled: yes
        gpgcheck: yes
        gpgkey: 'file:///etc/pki/rpm-gpg/RPM-GPG-KEY-CentOS-7'
        file: nexus

    - name: Install latest mainline kernel
      yum:
        name: kernel-ml
        state: latest
      notify: reboot server

    - name: add subgids to vagrant user
      command:
        cmd: "usermod --add-subuids 200000-265535 --add-subgids 200000-265535 vagrant"

    - name: Enable user namespaces
      sysctl:
        name: '{{ item.name }}'
        value: '{{ item.value }}'
      loop:
        - name: user.max_user_namespaces
          value: 192280

    - name: Flush handlers
      meta: flush_handlers

    - name: Install container tools
      yum:
        name:
          - podman
          - podman-docker
          - buildah
          - skopeo
        state: latest

    - name: Update all packages
      yum:
        name: '*'
        state: latest


  handlers:
    - name: update ca trust
      shell: update-ca-trust

    - name: set grub2 default entry
      command:
        cmd: 'grub2-set-default 0'
      listen: reboot server
    - name: do reboot
      reboot:
      listen: reboot server
Setting up the pipeline code
I had no idea about how to do this, but I found Darin Pope’s video about how to define pipelines and it was enough for my test.
The two more important things on that video were the explanation of the Jenkinsfile and were to place it, and how to configure a multibranch pipeline. Then I was able to write my first pipeline:
pipeline {
    triggers {
        pollSCM('') // Enabling being build on Push
    }
    agent { label 'hypervisor' }
    stages {
        stage('Copy custom files'){
            steps {
                sh('cp ~/.ssh/id_rsa.pub ${WORKSPACE}/provisioning/keys/cotterpin-id_rsa.pub')
                sh('cp ~/anthraxca.crt ${WORKSPACE}/provisioning/files/anthraxca.crt')
            }
        }
        stage('Vagrant Cleanup') {
            steps {
                sh('/usr/bin/vagrant destroy -f')
            }
        }
        stage('Vagrant up') {
            steps {
                sh('/usr/bin/vagrant up')
                sh('/usr/bin/vagrant halt')
            }
        }
        stage('Run container') {
            steps {
                sh('/usr/bin/vagrant up')
                sh('/usr/bin/vagrant ssh node1 -c "podman run --rm -it busybox echo Hello World!"')
            }
        }
    }
}
I recognize I had to perform several changes from my first attempt to the first running one, mostly for not knowing the exact syntax for running commands through vagrant ssh and a couple of minor mistakes on the podman invocation.
Once committed and pushed to my gitlab instance, it was time to configure the multibranch pipeline.
Configuring a multibranch pipeline
NOTE: I’m not sure if I actually needed a multibranch, because in my test I was using only one branch, but maybe it will be useful for having distinct deployments on different branches.
The first step was choosing a name and selecting “Multibranch Pipeline” from the “New Item” screen.
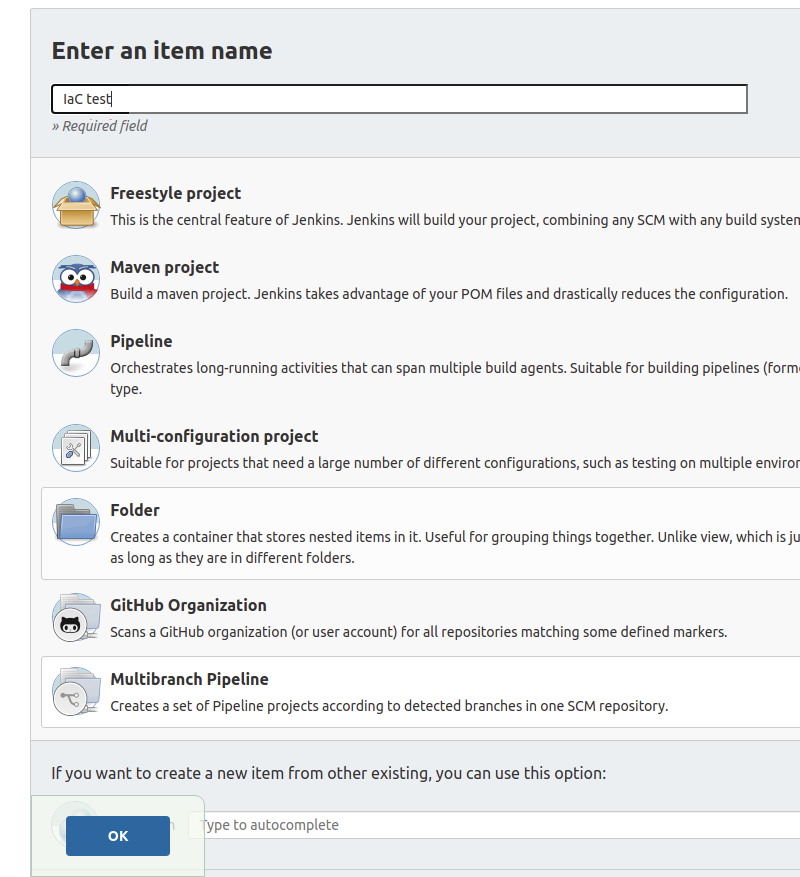
After clicking the “OK” button, the configuration page appeared, there were two important sections there: “Branch Sources” and “Build Configuration”
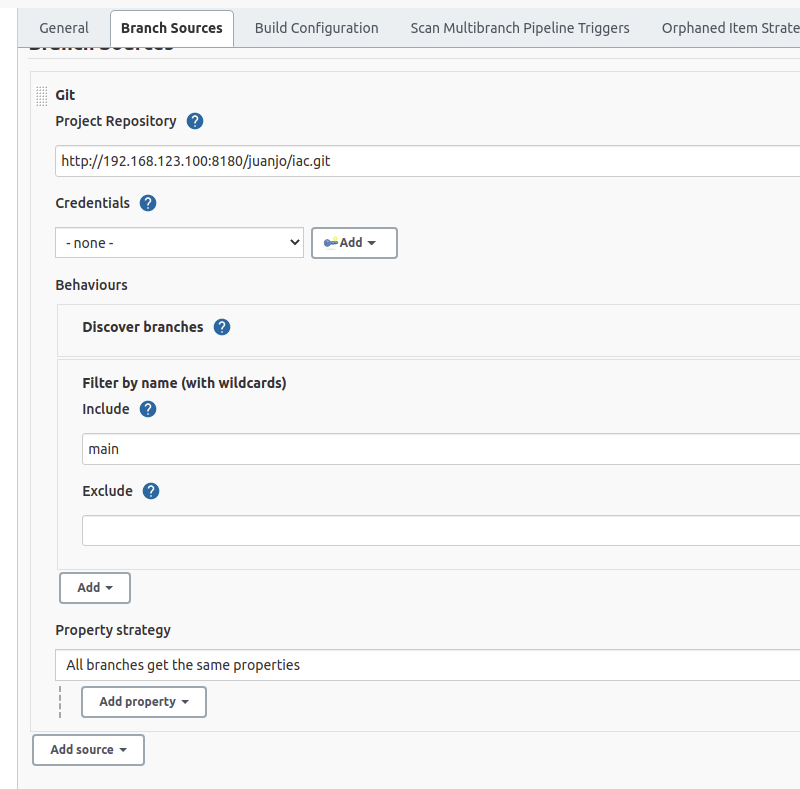
In the “Branch sources” section I specified my project’s url on my gitlab instance and the branch name, “main” in my case. As it was a multibranch project, several branches can be included or excluded by regular expressions or wildcard expressions, an example would be using “iac-pro-*” as branch name if the IaC followed that naming rule.
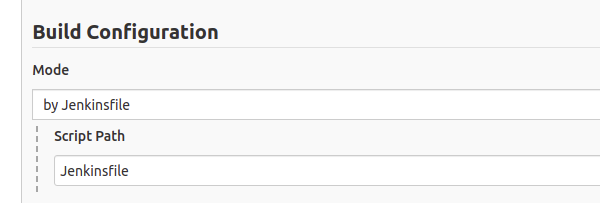
On the “Build Configurations” section I left the default values, which meant “Use a jenkins file named Jenkinsfile on the root of the project”.
Just after saving changes a scan task was triggered to check if any branch matched the criteria and if it contains a Jenkinsfile.
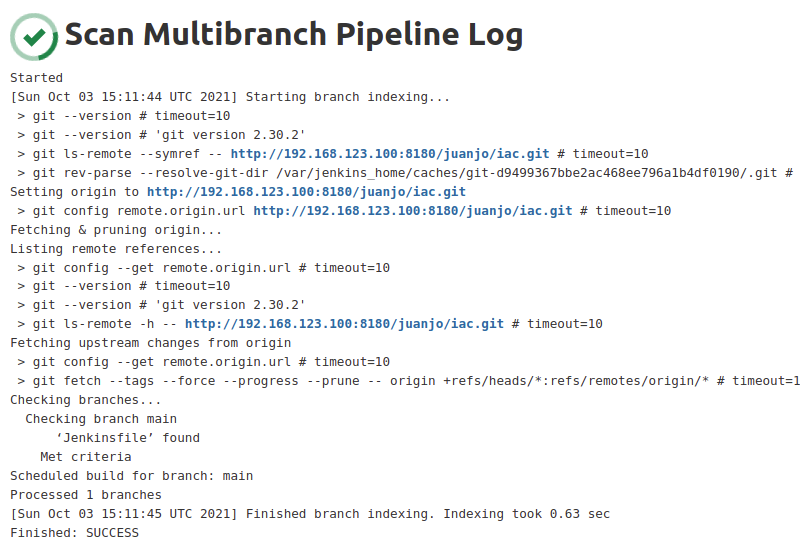
Then the first build attempt was triggered, but the console output was clear about the error.
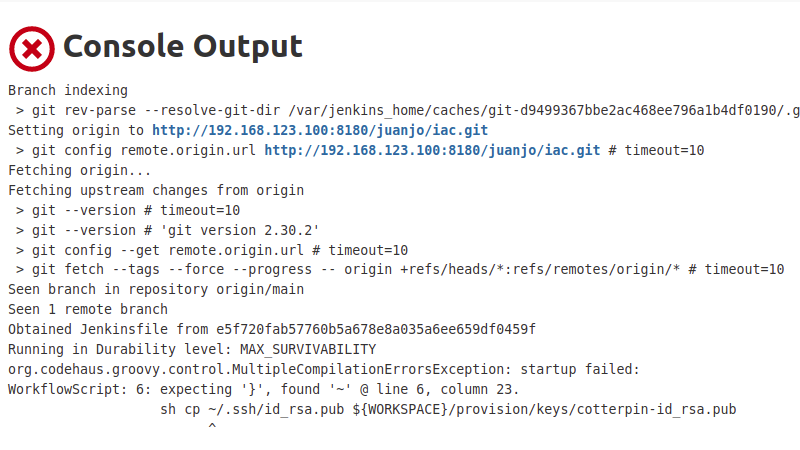
At this point, I started a loop of trial->error->fix. At the beginning I triggered SCM scans manually from the interface, I was expecting some kind of magic telling jenkings when to try again. Then I tried to configure a webhook on gitlab, but it complained about using the same IP address to trigger and didn’t let me configure the webhook. So I started triggering the notifyCommit callback from my CLI just after every push.
curl -v "http://192.168.123.100:8080/git/notifyCommit?url=http://192.168.123.100:8180/juanjo/iac.git&delay=0sec"

Then I understood that the setting “Periodically if not otherwise run” under “Scan Multibranch Pipeline Triggers” would have allowed me to perform periodical scans of the repository.

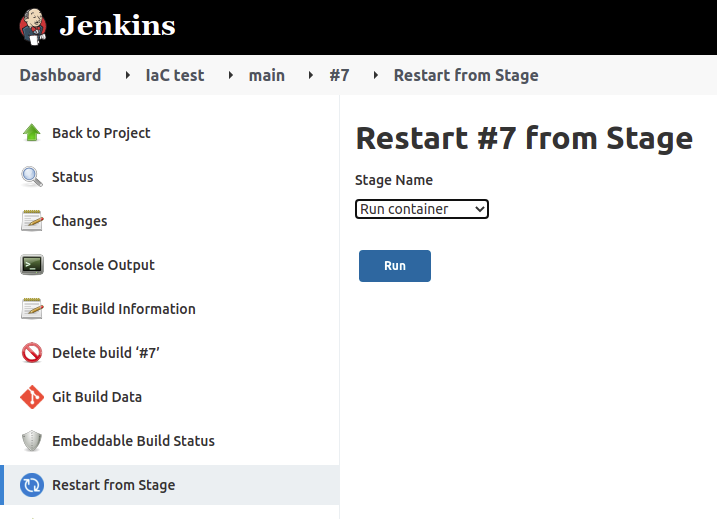
On my tests, I also tried to replay only the last (failed) stage, but it pulls the same commit as the failed task, so the changes were not reflected. But it’s important being aware of this feature, it would be useful in cases were the problem is external to the repository, for instance a network problem preventing some test to be run.
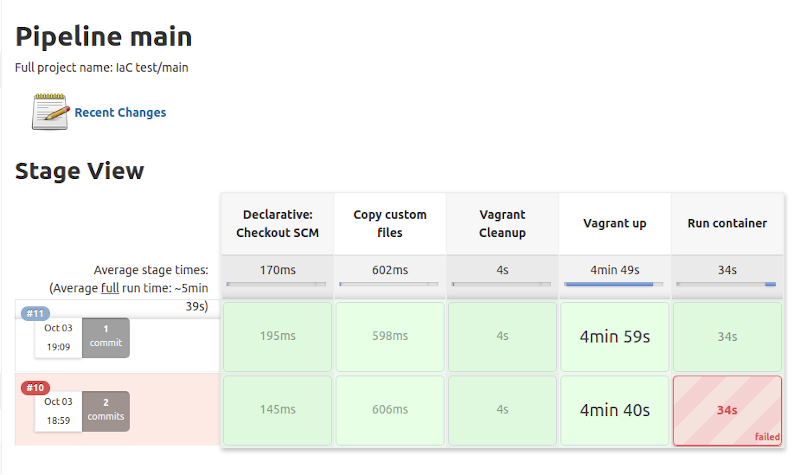
But the important thing is, after several attempts I managed to complete the exercise.
Conclusion
Jenkins pipelines are a powerful tool to use on CI/CD integrations, maybe its learning curve is steep, but it’s worth it. Storing the pipeline definition itself with the code guarantees having it under version control, even being able of using the same exact pipeline on several environments.
References
- EL Repo Project: http://elrepo.org/tiki/HomePage
- Blog entry about how to update the kernel on CentOS: https://phoenixnap.com/kb/how-to-upgrade-kernel-centos
- Video about defining multibranch pipelines: https://www.youtube.com/watch?v=mbeQWBNaNKQ
- Entry about setting comming notification: https://stackoverflow.com/questions/42062481/how-to-trigger-a-jenkins-multibranch-pipeline-when-code-change-is-pushed-to-gith