Starting with Docker Swarm
After last week’s break, and having managed to get the RHCE certification, it’s time I get on containers.
One of my first experiences, if not the first, with docker compose was deploying a graylog stack, with a couple of elasticsearch nodes, a mongod container, even I included haproxy and a rsyslog container on the deployment. And I’ve been taking advantage of it every time I wanted to test some configuration options, behaviors or performance, but I was limited to a single host experience.
But nowadays, having a little more knowledge of Ansible and Vagrant, I thought it was the right moment to step into swarming.
Finding the right role
Ansible Galaxy was hosts several roles for managing several aspects of docker and docker swarm, but, by looking at the numbers, I chose Andrea Tosstto’s docker-swarm role because it was the most downloaded and had 4,5 out of 5 stars, and I installed on a role folder inside my project.
ansible-galaxy role install atosatto.docker-swarm -p roles
Then I followed the instructions on its README.md file to set up the inventory:
node1
node2
node3

[docker_engine]
node1
node2
node3

[docker_swarm_manager]
node1

[docker_swarm_worker]
node2
node3
I tried to keep it simple, but my lack of knowledge about docker swarm, running constraints, etc. made me do extra work later.
Then I wrote a playbook to use the role:
---
- name: Deploy a swarm
  hosts: all
  pre_tasks:
    - name: update all
      package:
        name: "*"
        state: latest
    - name: create group docker
      group:
        name: docker
        state: present
    - name: create user
      user:
        name: dockeradm
        groups: docker
        append: yes
        state: present
  roles:
    - atosatto.docker-swarm
As I was using vagrant boxes, the first task was updating them. And as docker on CentOS doesn’t create the docker group, I did it, and also created a user in that group. Then I included the role.
The first attempt failed because a fixed package version is used on the role when it detects CentOS/RHEL 8 as OS. I changed the role to use the best available from docker-ce repository.
--- a/atosatto.docker-swarm/tasks/setup-containerd.yml	2020-05-08 13:29:54.000000000 +0200
+++ b/atosatto.docker-swarm/tasks/setup-containerd.yml	2021-06-13 08:50:57.241995237 +0200
@@ -23,7 +23,7 @@

 - name: Install containerd on RHEL 8.
   package:
-    name: "https://download.docker.com/linux/centos/7/x86_64/stable/Packages/containerd.io-1.2.6-3.3.el7.x86_64.rpm"
+    name: "{{ containerd_package_name }}{{ _containerd_package_version | default('') }}"
     state: "{{ containerd_package_state }}"
   when: ansible_os_family == 'RedHat' and ansible_distribution_major_version == '8'
The second attempt failed because of a fixed release version on the docker-repo url generated a depency problem, so I edited the vars file to use the standard $releasever variable.
--- a/atosatto.docker-swarm/vars/main.yml	2020-05-08 13:29:54.000000000 +0200
+++ b/atosatto.docker-swarm/vars/main.yml	2021-06-13 09:06:23.301258602 +0200
@@ -6,7 +6,7 @@
 # Docker CE stable release repository
 docker_repo_ce_stable:
   name: "docker_ce_stable"
-  yum_repo: "https://download.docker.com/linux/centos/7/$basearch/stable"
+  yum_repo: "https://download.docker.com/linux/centos/$releasever/$basearch/stable"
   yum_gpg_key: "https://download.docker.com/linux/centos/gpg"
   yum_gpg_check: "yes"
   apt_repo: "deb [arch={{ docker_architecture[ansible_architecture] }}] https://download.docker.com/linux/{{ ansible_distribution | lower }} {{ ansible_distribution_release }} stable"
@@ -16,7 +16,7 @@
 # Docker CE edge release repository
 docker_repo_ce_edge:
   name: "docker_ce_edge"
-  yum_repo: "https://download.docker.com/linux/centos/7/$basearch/edge"
+  yum_repo: "https://download.docker.com/linux/centos/$releasever/$basearch/edge"
   yum_gpg_key: "https://download.docker.com/linux/centos/gpg"
   yum_gpg_check: "yes"
   apt_repo: "deb [arch={{ docker_architecture[ansible_architecture] }}] https://download.docker.com/linux/{{ ansible_distribution | lower }} {{ ansible_distribution_release }} edge"
@@ -26,7 +26,7 @@
 # Docker CE test release repository
 docker_repo_ce_test:
   name: "docker_ce_test"
-  yum_repo: "https://download.docker.com/linux/centos/7/$basearch/test"
+  yum_repo: "https://download.docker.com/linux/centos/$releasever/$basearch/test"
   yum_gpg_key: "https://download.docker.com/linux/centos/gpg"
   yum_gpg_check: "yes"
   apt_repo: "deb [arch={{ docker_architecture[ansible_architecture] }}] https://download.docker.com/linux/{{ ansible_distribution | lower }} {{ ansible_distribution_release }} test"
@@ -36,7 +36,7 @@
 # Docker CE nightly release repository
 docker_repo_ce_nightly:
   name: "docker_ce_nightly"
-  yum_repo: "https://download.docker.com/linux/centos/7/$basearch/nightly"
+  yum_repo: "https://download.docker.com/linux/centos/$releasever/$basearch/nightly"
   yum_gpg_key: "https://download.docker.com/linux/centos/gpg"
   yum_gpg_check: "yes"
   apt_repo: "deb [arch={{ docker_architecture[ansible_architecture] }}] https://download.docker.com/linux/{{ ansible_distribution | lower }} {{ ansible_distribution_release }} nightly"
The third attempt failed at the point of connecting workers with the master, that happened because vagrant boxes use virtualbox’s NAT network as default route, so they were trying to connect to themselves as all of them use the same IP. In order to solve this I forced the role to use eth1 as interface setting up the docker_swarm_interface variable at play level.
docker_swarm_interface: eth1
I ran the playbook again and this time the error was on the docker-compose installation part while processing the latest tag from github.
TASK [atosatto.docker-swarm : Extract the name of the latest docker-compose release tag.] *******************************************************************************************************************
fatal: [node1]: FAILED! => {"msg": "You need to install \"jmespath\" prior to running json_query filter"}
fatal: [node2]: FAILED! => {"msg": "You need to install \"jmespath\" prior to running json_query filter"}
fatal: [node3]: FAILED! => {"msg": "You need to install \"jmespath\" prior to running json_query filter"}
I had python3-jmespath installed from rpm as dependecy of the rhel-system-roles package and I didn’t want to mess around with conflicts of libraries installed from packages and from pip, so I set up the variable docker_compose_version to the latest available at the moment of writing: 1.29.2.
docker_compose_version: 1.29.2
Then I was able to complete the playbook’s run, and I had my swarm up and running.
# docker node ls
ID                            HOSTNAME   STATUS    AVAILABILITY   MANAGER STATUS   ENGINE VERSION
yoi5t8o8q0tfj31qbzcdkqy5r *   node1      Ready     Active         Leader           20.10.7
qxun34z5sb4g97lz47ruet7wn     node2      Ready     Active                          20.10.7
z68z6h23qtanw7sobt68n876c     node3      Ready     Active                          20.10.7
Deploying mongodb
Deploying graylog requires a mongodb database along with an elasticsearch cluster, I thought starting with mongodb was easier than starting with elasticsearch.
Blake Mitchel’s Running a mongodb replica set on docker article on medium](https://medium.com/@kalahari/running-a-mongodb-replica-set-on-docker-1-12-swarm-mode-step-by-step-a5f3ba07d06e) gave me a bit of understanding about scheduling constraints and Shao-Tung Chang’s mongodb docker swarm example was a well documented docker-compose example.
As I said when I showed my inventory, it lacked some things, like the node tags needed to pin mongodb containers to nodes, so I had to add them by hand:
# docker node update --label-add mongo.replica=1 node1
node1
# docker node update --label-add mongo.replica=2 node2
node2
# docker node update --label-add mongo.replica=3 node3
node3
I could skip this part if I had used swarm_labels at the inventory as role’s documentation suggested.
Once nodes were tagged, I deployed the service onto the swarm, as I changed Chang’s composer file to update the mongo image version to 4, I also had to remove the –smallfiles option and also changed the name of the replicaset to graylog.
# docker stack deploy -c mongodb-compose.yml overlay
Creating network overlay_mongo
Creating service overlay_mongo1
Creating service overlay_mongo2
Creating service overlay_mongo3

# docker service list
ID             NAME             MODE         REPLICAS   IMAGE     PORTS
hd1mjwuxu9uc   overlay_mongo1   replicated   1/1        mongo:4
36333rrvfty2   overlay_mongo2   replicated   1/1        mongo:4
syyk1z0uupr2   overlay_mongo3   replicated   1/1        mongo:4
Then I ran Chang’s initiate-master script which initializes the replica set.
As in this exercise I wasn’t using authentication, I kept the mongodb containers isolated and didn’t publish any port.
Deploying elasticsearch
Jakub Hajek’s elasticsearch docker swarm project on GitHub documents thoroughly how to deploy elasticsearch on a swarm, and his setup of 3 master elasticsearch nodes, 4 data nodes, 2 coordinating nodes, kibana and traefik is great for production use, it’s too much for a simple #learnbydoing exercise, but he has also a gist about deploying Elasticsearch 7.
Deploying graylog
This part was also a bit tricky, deploying the master node was pretty straightforward, but adding slave nodes required several tries. Gijsbert ter Horst’s graylog 4 docker-compose gist was created to test a bug, but it served me as inspiration.
The compose part for the master node was.
  graylogmaster:
    image: graylog/graylog:4.0.8
    environment:
      - GRAYLOG_PASSWORD_SECRET=thisisnotarandomtext
      # Password: admin
      - GRAYLOG_ROOT_PASSWORD_SHA2=XXXXXXXXXXXXXXXXXXXXXXXXXX
      - GRAYLOG_HTTP_EXTERNAL_URI=http://192.168.33.201:9000/
      - GRAYLOG_IS_MASTER=True
      - GRAYLOG_MONGODB_URI=mongodb://mongo1:27017,mongo2:27017,mongo3:27017/graylog?replicaSet=graylog
      - GRAYLOG_ELASTICSEARCH_HOSTS=http://data1:9200,http://data2:9200
    networks:
      - graylog
    deploy:
      placement:
        constraints: [node.hostname == node1]
      replicas: 1
      resources:
        limits:
          memory: 2G
    ports:
      - published: 9000
        target: 9000
Then I tried to use service replicas for the slave nodes, but it didn’t work because they registered themselves with an auto-detected ip wich was not reachable from the master. So I created the slave configuration statically for graylogslave2 and graylogslave3 setting the GRAYLOG_HTTP_PUBLISH_URI accordingly.
  graylogslave2:
    image: graylog/graylog:4.0.8
    hostname: graylogslave2
    environment:
      - GRAYLOG_PASSWORD_SECRET=thisisnotarandomtext
      # Password: admin
      - GRAYLOG_ROOT_PASSWORD_SHA2=da248eeaffa573da8c323c3eb56aaf32ec6ce244e401a24c55f30c907d0bbfb5
      - GRAYLOG_HTTP_EXTERNAL_URI=http://192.168.33.201:9000/
      - GRAYLOG_IS_MASTER=False
      - GRAYLOG_MONGODB_URI=mongodb://mongo1:27017,mongo2:27017,mongo3:27017/graylog?replicaSet=graylog
      - GRAYLOG_ELASTICSEARCH_HOSTS=http://data1:9200,http://data2:9200
      - GRAYLOG_HTTP_PUBLISH_URI=http://graylogslave2:9000/
    networks:
      - graylog

    deploy:
      placement:
        constraints: [node.hostname == node2]
      replicas: 1
      resources:
        limits:
          memory: 2G
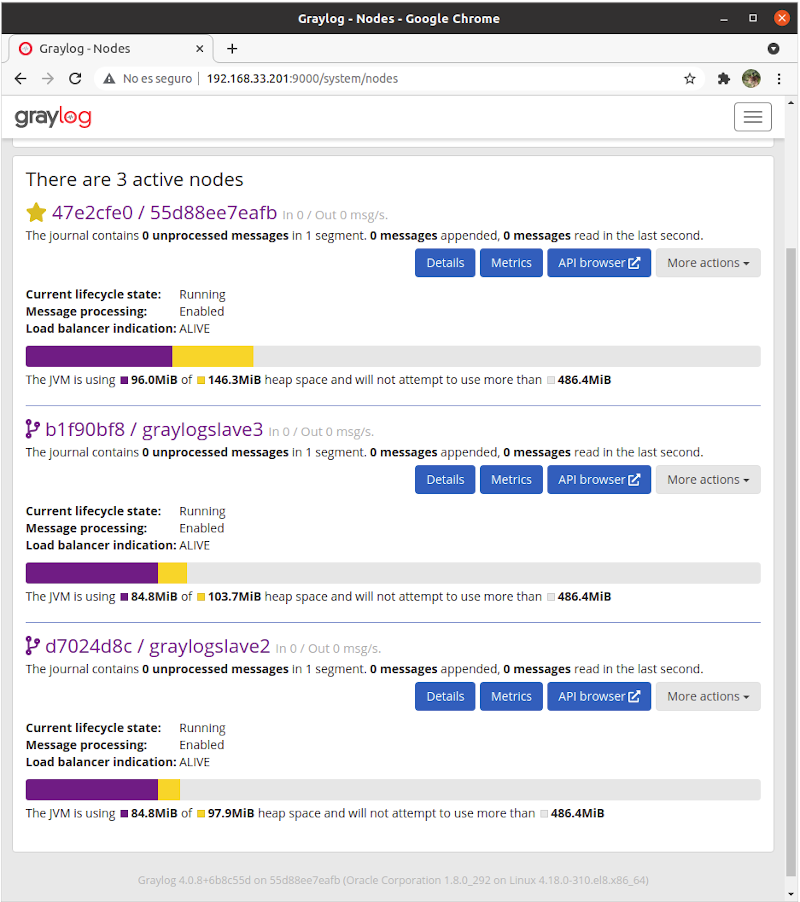
Conclusion
After deploying the graylog nodes I had a complete graylog stack deployed on docker swarm, but it wasn’t completely functional as no inputs were configured. As services are defined statically, it will require a haproxy instance to interface with the outside world, but that will be the next week’s work.
The files used in this lab are available at my labs repo on github