Deploying Nexus OSS on Kubernetes
Sonatype Nexus is one of the most complete solution to store all kind of artifacts from docker images to maven packages. In my previous post Setup Nexus OSS as docker registry I covered how to deploy it using docker-compose and how to set it up to proxy docker images. In this post, I’ll cover how two deploy it to a kubernetes cluster running on Azure AKS using helm charts. And I’m not going to lie, I requested a little help from chatGPT, with mixed results.
Note before starting
The process described here should be compatible with any standard kubernetes cluster, but bear in mind some limitations: most of the publicly available helm charts doesn’t work with Azure HTTP application routing or the Application Gateway Ingress Controller. The former works great for small deployments, as the only thing you need to add is an annotation, and most charts provide a way to add extra annotations; and the latter works great if you don’t require specific features. In my case, as I wanted to deploy nexus in the most portable way, I installed an standard nginx ingress controller on my AKS cluster.
Deploying Nexus OSS using the helm chart
I used the nexus-repository-manager with the caveat of being deprecated and not recommended for containerized deployments because of the use of embedded databases, but, for training purposes, it was enough. Also, the other available helm charts were for the pro version, not the OSS one.
First step was to add the repo to my local instance:
helm repo add sonatype https://sonatype.github.io/helm3-charts/
Then I dumped the chart values to have a starting point:
helm show values sonatype/nexus-repository-manager|tee values.yaml
But, in the end, I only changed the ingress part:
---
ingress:
  enabled: true
  ingressClassName: nginx
  annotations:
    nginx.ingress.kubernetes.io/proxy-body-size: "0"
  hostPath: /
  hostRepo: nexus.aks.garciaamaya.com
  tls:
    - secretName: star-aks-garciaamaya-com
      hosts:
        - nexus.aks.garciaamaya.com
I also tested defining a docker repository on the values file under nexus.docker.repositories but it only created another service and a extra ingress, but as I was only defining one proxy repository, it didn’t provide too much help.
I manually created the nexus-rm namespace and added my certificate as a secret:
kubectl create namespace nexus-rm
kubectl -n nexus-rm create secret tls star-aks-garciaamaya-com \
  --cert=star.aks.garciaamaya.com.crt \
  --key=star.aks.garciaamaya.com.key
Then I installed the helm chart:
helm upgrade --install -f values.yaml -n nexus-rm nexus-rm sonatype/nexus-repository-manager
After a few seconds, I got the result.
Release "nexus-rm" does not exist. Installing it now.
NAME: nexus-rm
LAST DEPLOYED: Mon Apr 10 11:47:40 2023
NAMESPACE: nexus-rm
STATUS: deployed
REVISION: 1
NOTES:
1. Your ingresses are available here:
  https://nexus.aks.garciaamaya.com/
Nexus OSS took several seconds to start, as it was creating all database artifacts and other structures, I watched the logs using the command:
kubectl -n nexus-rm logs -f deployment/nexus-rm-nexus-repository-manager
When logging in for the first time, I was required to enter the random password gereated during boot, I got it from the corresponding POD, it looks like an UUID:
kubectl exec -n nexus-rm $(kubectl get pods --namespace nexus-rm -l "app.kubernetes.io/name=nexus-repository-manager,app.kubernetes.io/instance=nexus-rm" -o jsonpath="{.items[0].metadata.name}") -- cat /nexus-data/admin.password
And I was redirected to a wizard to update the admin password and to choose between anonymous or authenticated access to the repo. In order to face less problems, I selected anonymous access.
Create the repositories
I was trying to use configuration-as-code for this deployment, but I didn’t find any way to do it on the OSS version, but I ended up having some API calls:
Setting up the admin password can also be done with api calls:
export NXPWD=chang3m3

export NX_ORIGINAL_PWD=`kubectl exec -n nexus-rm $(kubectl get pods --namespace nexus-rm -l "app.kubernetes.io/name=nexus-repository-manager,app.kubernetes.io/instance=nexus-rm" -o jsonpath="{.items[0].metadata.name}") -- cat /nexus-data/admin.password`

curl -X 'PUT' -i \
  'https://nexus.aks.garciaamaya.com/service/rest/v1/security/users/admin/change-password' \
  -H 'accept: application/json' \
  -H 'Content-Type: text/plain' \
  -d "$NXPWD" \
  -u "admin:$NX_ORIGINAL_PWD"
The output should include a 2XX response code:
HTTP/2 204
date: Mon, 10 Apr 2023 11:50:53 GMT
x-content-type-options: nosniff
strict-transport-security: max-age=15724800; includeSubDomains
Enabling anonymous access could be done through API too:
curl -X 'PUT' -i \
  'https://nexus.aks.garciaamaya.com/service/rest/v1/security/anonymous' \
  -H 'accept: application/json' \
  -H 'Content-Type: application/json' \
  -u "admin:$NXPWD" \
  -d '{
  "enabled": true,
  "userId": "anonymous",
  "realmName": "NexusAuthorizingRealm"
}'
Setting up the docker proxy repo
On the previous about nexus post I used the UI to create the docker proxy repository, in this case I created a json file repo-proxied-dockerhub.json with the following contents:
{
  "name": "proxied-docker",
  "online": true,
  "storage": {
    "blobStoreName": "default",
    "strictContentTypeValidation": true,
    "writePolicy": "ALLOW"
  },
  "cleanup": null,
  "docker": {
    "v1Enabled": false,
    "forceBasicAuth": false,
    "httpPort": 8082,
    "httpsPort": null,
    "subdomain": null
  },
  "dockerProxy": {
    "indexType": "HUB",
    "indexUrl": null,
    "cacheForeignLayers": true,
    "foreignLayerUrlWhitelist": [
      ".*"
    ]
  },
  "proxy": {
    "remoteUrl": "https://registry-1.docker.io",
    "contentMaxAge": -1,
    "metadataMaxAge": -1
  },
  "negativeCache": {
    "enabled": true,
    "timeToLive": 1440
  },
  "httpClient": {
    "blocked": false,
    "autoBlock": true,
    "connection": {
      "retries": null,
      "userAgentSuffix": null,
      "timeout": null,
      "enableCircularRedirects": false,
      "enableCookies": false,
      "useTrustStore": false
    },
    "authentication": null
  },
  "routingRuleName": null,
  "format": "docker",
  "type": "proxy"
}
And applied it using a curl call:
curl -X POST -i \
  'https://nexus.aks.garciaamaya.com/service/rest/v1/repositories/docker/proxy' \
  -d @repo-proxied-dockerhub.json \
  -H 'accept: application/json' \
  -H 'Content-Type: application/json' \
  -u "admin:$NXPWD"
But, in order to expose it, I needed to patch the nexus-rm-nexus-repository-manager service to expose the port 8082 and the nexus-rm-nexus-repository-manager ingress to redirect the /v2 path to this service.
kubectl -n nexus-rm patch svc nexus-rm-nexus-repository-manager -p '{"spec":{"ports":[{"name":"docker-port","port":8082,"targetPort":8082}]}}'

kubectl -n nexus-rm patch ingress nexus-rm-nexus-repository-manager  --type=json -p '[{"op":"add","path":"/spec/rules/0/http/paths/-","value":{"path":"/v2","pathType":"Prefix","backend":{"service":{"name":"nexus-rm-nexus-repository-manager","port":{"number":8082}}}}}]'
I asked for the patch command to ChatGPT, and it almost gave me the solution, its response had an error on the backend object, maybe due to the vast differences on kubernetes api during its training time. Also I had to ask it to explicitly use the opp:add method to preserve the existing path objects.
Also, in order to allow anonymous pull, I had to activate the Docker Bearer Token realm, I did it with another curl call:
curl -X PUT -i \
  'https://nexus.aks.garciaamaya.com/service/rest/v1/security/realms/active' \
  -H 'accept: application/json' \
  -H 'Content-Type: application/json' \
  -d '["NexusAuthenticatingRealm","NexusAuthorizingRealm","DockerToken", "NpmToken"]' \
  -u "admin:$NXPWD"
And, configured my host to use nexus adding it to my /etc/docker/daemon.json and restarting the docker daemon:
#/etc/docker/daemon.json
{
  "registry-mirrors":["https://nexus.aks.garciaamaya.com:443"]
}
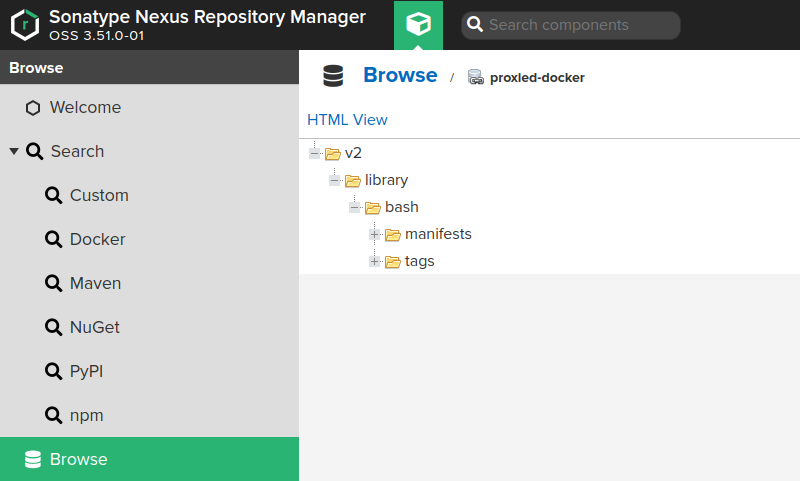
After pulling the bash image, I could see it on the repository explorer:
Setting up the pypi proxy repo
Creating a pypi proxy for python packages is also very simple from the interface, but also using the REST API. I created a repo-proxied-pypi.json file with the following contents.
{
  "name": "proxied-pypi",
  "format": "pypi",
  "online": true,
  "storage": {
    "blobStoreName": "default",
    "strictContentTypeValidation": true
  },
  "cleanup": null,
  "proxy": {
    "remoteUrl": "https://pypi.org",
    "contentMaxAge": -1,
    "metadataMaxAge": -1
  },
  "negativeCache": {
    "enabled": true,
    "timeToLive": 15
  },
  "httpClient": {
    "blocked": false,
    "autoBlock": true,
    "connection": {
      "retries": null,
      "userAgentSuffix": null,
      "timeout": null,
      "enableCircularRedirects": false,
      "enableCookies": false,
      "useTrustStore": false
    },
    "authentication": null
  },
  "routingRuleName": null,
  "type": "proxy"
}
And used curl to post it to Nexus
curl -X POST -i \
  'https://nexus.aks.garciaamaya.com/service/rest/v1/repositories/pypi/proxy' \
  -d @repo-proxied-pypi.json \
  -H 'accept: application/json' \
  -H 'Content-Type: application/json' \
  -u "admin:$NXPWD"
Once the repo was created, I had to test it, I found how to do it on the Awasu’s blog post, I used a docker container to not mess with my computer:
docker run --rm -it --entrypoint bash python:3
And inside the container I used cat to create a config as vi wasn’t available:
mkdir -p ~/.config/pip
cat <<EOF|tee ~/.config/pip/pip.conf
[global]
index = https://nexus.aks.garciaamaya.com/repository/proxied-pypi/pypi
index-url = https://nexus.aks.garciaamaya.com/repository/proxied-pypi/simple
trusted-host = nexus.aks.garciaamaya.com
EOF
Then I installed the boto3 package to verify it was using the proxied repo:
pip install boto3
  Looking in indexes: https://nexus.aks.garciaamaya.com/repository/proxied-pypi/simple
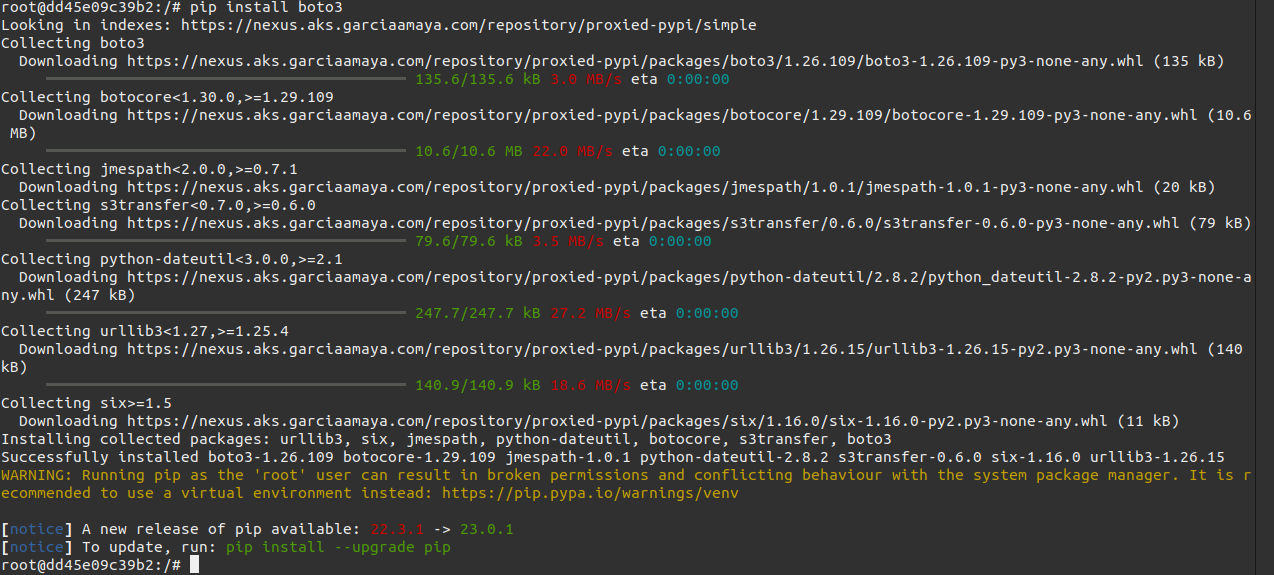
Also, I could find the packages on the repository
Setting up the npm proxy repo
I also deployed a proxy repo for node.js packages, again using the API, the contents of repo-proxied-npm.json were:
{
  "name": "proxied-npm",
  "online": true,
  "storage": {
    "blobStoreName": "default",
    "strictContentTypeValidation": true,
    "writePolicy": "ALLOW"
  },
  "cleanup": null,
  "proxy": {
    "remoteUrl": "https://registry.npmjs.org",
    "contentMaxAge": -1,
    "metadataMaxAge": -1
  },
  "negativeCache": {
    "enabled": true,
    "timeToLive": 15
  },
  "httpClient": {
    "blocked": false,
    "autoBlock": true,
    "connection": {
      "retries": null,
      "userAgentSuffix": null,
      "timeout": null,
      "enableCircularRedirects": false,
      "enableCookies": false,
      "useTrustStore": false
    },
    "authentication": null
  },
  "routingRuleName": null,
  "npm": {
    "removeNonCataloged": false,
    "removeQuarantined": false
  },
  "format": "npm",
  "type": "proxy"
}
And the curl call:
curl -X POST -i \
  'https://nexus.aks.garciaamaya.com/service/rest/v1/repositories/npm/proxy' \
  -d @repo-proxied-npm.json \
  -H 'accept: application/json' \
  -H 'Content-Type: application/json' \
  -u "admin:$NXPWD"
The instructions to test the proxy repo were found on this sonatype blog post.
Again, I used a docker to work with node:
docker run --rm -it --entrypoint bash node:latest
And inside the container I ran:
npm --registry=https://nexus.aks.garciaamaya.com/repository/proxied-npm/ install -g aws-sdk
But I got an error:
npm ERR! code UNABLE_TO_VERIFY_LEAF_SIGNATURE
npm ERR! errno UNABLE_TO_VERIFY_LEAF_SIGNATURE
npm ERR! request to https://nexus.aks.garciaamaya.com/repository/proxied-npm/aws-sdk failed, reason: unable to verify the first certificate

npm ERR! A complete log of this run can be found in:
npm ERR!     /root/.npm/_logs/2023-04-10T16_32_16_875Z-debug-0.log
This error occurred because I’m using a custom Certificate Authority, so I had to tell npm to trust it. My first attempt was the standard linux ubuntu way, so I copied my certificate to /usr/local/share/ca-certificates and ran update-ca-certificates but no luck. I found the answer on this stackoverflow post
npm config -g set cafile /usr/local/share/ca-certificates/ca.crt
And then I was able to use the proxy repo:
npm --registry=https://nexus.aks.garciaamaya.com/repository/proxied-npm/ install -g aws-sdk
Which returned:
npm WARN deprecated querystring@0.2.0: The querystring API is considered Legacy. new code should use the URLSearchParams API instead.

added 30 packages in 7s

12 packages are looking for funding
  run `npm fund` for details
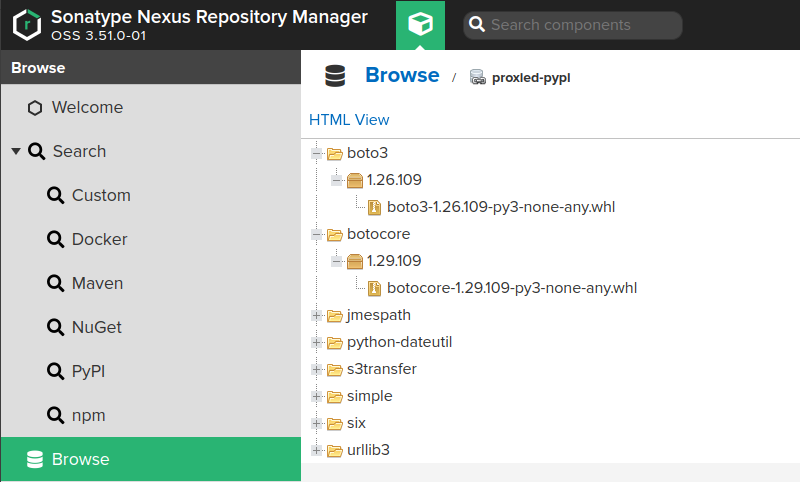
And again, I was able to find the proxied packages on the proxy’s storage:
Conclusions
It took me more than I expected to get it working, and I expected being able to automate all the repository configuration but didn’t found a way to it. Also, discovering that some features, like postgresql support is kept for the pro version, disappointed me.
But now I have more understanding about Nexus Repository Manager, how it works, and the most important part, its API, which I had never use it before.
For the future, I’d like to improve the chart and adapt it to use Stateful sets instead of Deployments, as I don’t want to loose the configuration when something happens.
References
- Nexus helm chart https://github.com/sonatype/nxrm3-helm-repository/tree/main/nexus-repository-manager
- Nexus as docker registry proxy https://juanjo.garciaamaya.com/posts/docker/setup-nexus-oss-as-docker-registry-proxy/
- Nexus as PyPi proxy https://awasu.com/weblog/nexus3/pypi/ by Awasu
- Nexus as npm proxy https://blog.sonatype.com/using-nexus-3-as-your-repository-part-2-npm-packages
- Trust certificates in npm https://stackoverflow.com/questions/17033648/how-do-i-configure-npm-to-trust-the-firewall-issuer-for-https-proxying
- Files on my repo https://github.com/juanjo-vlc/homelab/tree/main/k8s-nexus